
There are many challenges when photographing reflective objects such as controlling highlights (especially the specular highlight, or reflection of the light source), controlling contrast and how to deal with unwanted reflections.
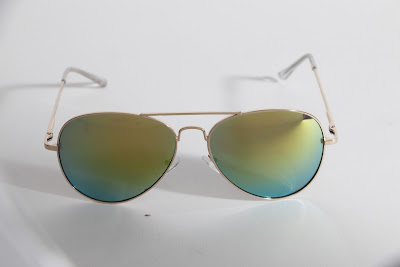
Highly reflective subjects, such as these sunglasses, will often reflect unwanted or distracting things from the room.

We can see not only the reflection of the light source itself (specular highlight) but also details of the ceiling in the room.
One of the first things to try is to vary the angle of something. For this next image we changed the angle of the glasses and also moved the light.

Now we have a better view of what the lenses of the glasses look like and no specular highlight, but we have a new problem, which is that we can see the edge of the table that the glasses are sitting on.
One solution was to hold a white card to cover the area that was being reflected by the lenses.


Changing the angle of the camera, object, or light are often a good place to start with reflective objects.
We also tried out the light tent which is a big, semi-translucent white box that reduces shadows, reflections and gives a large, soft light.

Here's a tutorial for how to make your own light tent using simple house-hold materials: http://www.boostyourphotography.com/2014/02/DIY-light-tent.html
Next we tried shooting a brushed steel thermos and paid attention to different placements and power of lights to create different effects for highlights on the sides.
 |
| One light with reflector |
 |
| Two lights with reflectors, one on either side |
 |
| Inside light tent |
Last we tried photographing a toaster. This creates a unique challenge since it is like one giant mirror.

Even with the trick we used for the sunglasses (holding up a white, black, or gray card to fill the reflection) we still see a reflection of the photographer, clamps and the edge of the table.
If we'd had a bit more time we might have been able to experiment more with tipping the toaster in different directions to help with this, but we managed to get a pretty clean shot using the light tent with only one gap for the lens, which could easily be edited out in post production.
 |
| Inside light tent, two lights to either side and slightly above |
 |
| Production Stills by Reilly O'Brien |
No comments:
Post a Comment