Each person will post their own images and descriptions.
For your final project you may either choose to do a lighting replication OR a freestyle image of your choosing using studio light.
Replication
Choice of photograph to replicate plus description of shoot is due to blog one week before final is due. Choose a photograph with lighting that you admire and wish to replicate. Try to recreate it in the studio, pay attention to every detail and get everything as close as you can to the original.
Create a diagram AND written description of the lighting. Write a short paragraph about what you liked about the lighting/why you chose to replicate it and the experience of making the recreation in the studio.
-OR-
Freestyle
Using all the skills you have learned in this class, create your own freestyle composition or set of images. Describe your work, what was the motivation behind the image? What were you trying to achieve and how did you use what you learned about light in this class to create your composition and lighting setup?
Create a diagram AND written description of the lighting. Write a short paragraph about what you were going for and how you achieved it. In addition to your blog post of the above project (at least one image) you are also required to make at least one 13" x 19" print to bring to class for critique on the final day of class.
Also due on the last day of class is all digital files from all assignments:
Drive, Disc or Digital Transfer with All Class Assignments
In addition to submitting the final project, due to the blog on the last day of class, students are required to submit a flash drive, disc or digital transfer of all digital files from all assignments in the following format:
Folder Name: Lehigh-LawsofLight-2017-05-Firstname_Lastname
Subfolders:
Assignment 1
Assignment 2… etc.
Each subfolder should contain all digital images from that assignment.
If submitting via digital transfer the transfer is due AT LEAST 3 HOURS BEFORE CLASS on the date of the final session.

Thursday, April 27, 2017
Lesson 13: LinkedIn / Professional Headshots Shoot
For our last session before the presentation of final projects the class chose to do a photo shoot to create LinkedIn / general purpose professional headshots.
The Team:
Art direction: Christine Kreschollek
Hair and makeup: Hana Non
Photographers: Cody Kjos, Reilly O'Brien, Tiancong Huang, Ryan Herzog and Christine Kreschollek
Wardrobe supervision: Jaclyn Sands
Head Electrician / Grip: Ryan Herzog
Digital Technician: Tiancong Huang
Christine envisioned a high key look on a white background with the following inspiration images and starting point for setup:

We ended up using a similar setup to this with two 1600 white lightnings in back, the 3200 white lightning as the key (at subject's left) with a large umbrella and the 800 white lightning with a reflector as a fill.
The results:

 |
| Production stills by Cody Kjos, Reilly O'Brien, Tiancong Huang, Ryan Herzog and Christine Kreschollek |
Thursday, April 20, 2017
Lesson 12: Reflective Objects
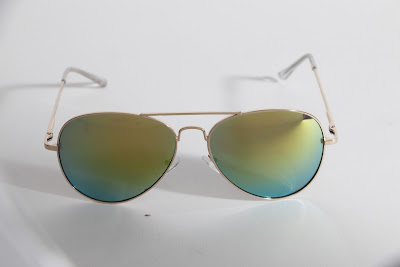
This week we experimented with photographing shiny objects.
There are many challenges when photographing reflective objects such as controlling highlights (especially the specular highlight, or reflection of the light source), controlling contrast and how to deal with unwanted reflections.
Highly reflective subjects, such as these sunglasses, will often reflect unwanted or distracting things from the room.

We can see not only the reflection of the light source itself (specular highlight) but also details of the ceiling in the room.
One of the first things to try is to vary the angle of something. For this next image we changed the angle of the glasses and also moved the light.

Now we have a better view of what the lenses of the glasses look like and no specular highlight, but we have a new problem, which is that we can see the edge of the table that the glasses are sitting on.
One solution was to hold a white card to cover the area that was being reflected by the lenses.


Changing the angle of the camera, object, or light are often a good place to start with reflective objects.
We also tried out the light tent which is a big, semi-translucent white box that reduces shadows, reflections and gives a large, soft light.

Here's a tutorial for how to make your own light tent using simple house-hold materials: http://www.boostyourphotography.com/2014/02/DIY-light-tent.html
Next we tried shooting a brushed steel thermos and paid attention to different placements and power of lights to create different effects for highlights on the sides.
Last we tried photographing a toaster. This creates a unique challenge since it is like one giant mirror.

Even with the trick we used for the sunglasses (holding up a white, black, or gray card to fill the reflection) we still see a reflection of the photographer, clamps and the edge of the table.
If we'd had a bit more time we might have been able to experiment more with tipping the toaster in different directions to help with this, but we managed to get a pretty clean shot using the light tent with only one gap for the lens, which could easily be edited out in post production.
There are many challenges when photographing reflective objects such as controlling highlights (especially the specular highlight, or reflection of the light source), controlling contrast and how to deal with unwanted reflections.
Highly reflective subjects, such as these sunglasses, will often reflect unwanted or distracting things from the room.

We can see not only the reflection of the light source itself (specular highlight) but also details of the ceiling in the room.
One of the first things to try is to vary the angle of something. For this next image we changed the angle of the glasses and also moved the light.

Now we have a better view of what the lenses of the glasses look like and no specular highlight, but we have a new problem, which is that we can see the edge of the table that the glasses are sitting on.
One solution was to hold a white card to cover the area that was being reflected by the lenses.

Changing the angle of the camera, object, or light are often a good place to start with reflective objects.
We also tried out the light tent which is a big, semi-translucent white box that reduces shadows, reflections and gives a large, soft light.
Here's a tutorial for how to make your own light tent using simple house-hold materials: http://www.boostyourphotography.com/2014/02/DIY-light-tent.html
Next we tried shooting a brushed steel thermos and paid attention to different placements and power of lights to create different effects for highlights on the sides.
 |
| One light with reflector |
 |
| Two lights with reflectors, one on either side |
 |
| Inside light tent |
Last we tried photographing a toaster. This creates a unique challenge since it is like one giant mirror.

Even with the trick we used for the sunglasses (holding up a white, black, or gray card to fill the reflection) we still see a reflection of the photographer, clamps and the edge of the table.
If we'd had a bit more time we might have been able to experiment more with tipping the toaster in different directions to help with this, but we managed to get a pretty clean shot using the light tent with only one gap for the lens, which could easily be edited out in post production.
 |
| Inside light tent, two lights to either side and slightly above |
 |
| Production Stills by Reilly O'Brien |
Assignment 12: Shiny Object + Sketches for Final
PART 1
Photograph a shiny object. Think about where the highlights are and how reflections are controlled.
Photograph a shiny object. Think about where the highlights are and how reflections are controlled.
Your chosen image should be well-exposed, aesthetically interesting and with intentional framing/background.
Label your photo with camera settings and a description and/or drawing of the lighting set-up.
Also write a few sentences about any challenges you had with dealing with reflections or shadows or what lighting setup you started with and what you needed to modify from there.
PART 2
In a separate blog post, write a few sentences about plans for your final project (due in two weeks on May 4). Include:
PART 2
In a separate blog post, write a few sentences about plans for your final project (due in two weeks on May 4). Include:
- Description of what you will photograph. Still life? (of what?) Portrait (of whom?)
- Description of setup (where will you photograph your subject? What kind of background or props will be used? If portraiture how will your subject be dressed/styled?)
- At least one photo that will be replicated or used for inspiration (can include more than one) and/or a sketch of what you would like your final result to look like. You do not have to be good at drawing as you can see in my example below.
- Sketch of how you will light your subject. This time you need to make a sketch; you can supplement with a description but you must have sketch. Please refer to the lightingsetup.psd file if you are familiar with Photoshop (I sent a link in a recent email) otherwise please sketch by hand and scan or photograph it or use an online drawing tool.
- What do you think will be the biggest challenge(s) of photographing this subject in this way and what are your plans for overcoming them?
Be as specific as possible. You can always deviate from your plans but the more you plan the more prepared and better off you will be the day of your shoot.
Example inspiration images, sketch and starting point for lighting setup:

This was the resulting image I made from these sketches:

And the final lighting setup:

Example inspiration images, sketch and starting point for lighting setup:

This was the resulting image I made from these sketches:

And the final lighting setup:

Saturday, April 15, 2017
Lesson 11: ETTL Flash with Speedlights and Built-in Camera Flash
This week we continued our exploration of on-camera flash using TTL (Through The Lens) flash settings with both speedlights and the built-in flash on the Lehigh studio camera, the Canon EOS 70D.
Last week we watched this video explaining the difference between TTL, ETTL and ETTL II which is very helpful in understanding how all versions of TTL flash work and the differences between them.
To begin we worked with the Canon 580EX-II in ETTL mode, mounted on the hot shoe of the camera.
We first shot in P or Program mode. In Program mode the camera decides the aperture and shutter speed for you and with ETTL mode the speedlight and camera communicate with each other to choose a power setting for the flash.
The result is a decent exposure for the subject but still a little underexposed and the background is quite dark. If we wanted to make adjustments to the overall exposure in this setting we could use exposure compensation (adjusts aperture, shutter or ISO to let more light into the camera) or flash compensation (set on speedlight unit, will use higher power on flash), but more on that later.
Next we next tried Av and Tv settings. These are both semi-automatic camera settings that also allow the use of exposure compensation, but in addition will take ambient light into consideration.
First Tv, in this shooting mode you choose the shutter speed but the camera chooses the aperture. In this case since we were shooting with the flash in ETTL the flash and camera are still deciding on the power setting for the flash.
With Tv setting we chose a long shutter speed (2 seconds) to let in more ambient light.
Then we shot in Av mode. Av is the counterpart mode to Tv - now we choose the aperture and the camera chooses the shutter (based on information from the light meter and ETTL flash).
With Av selected we chose f4 because we knew it was dark in the room without much ambient light and the camera chose a shutter speed of 1/2 second so we see more ambient light and a bit of movement in this one.
Next we moved on to using the built-in flash. The Canon 70D has a small, built-in flash unit that can also operate in ETTL or Manual mode. Today we worked with it in ETTL mode.
First we shot with the built-in flash in P mode.
Then we experimented with exposure compensation and flash compensation.
Unfortunately when we were shooting in class this didn't have quite the effect we wanted, which was that with exposure compensation +1 the subject and the background should both appear slightly brighter. My guess as to why this did not work so well was because the camera would use aperture for this (hence making both subject lit with flash and any background/ambient light brighter) BUT we were at the limit of our aperture which was as wide as it could go for this focal length so both images appear the same.
So we moved on to flash compensation.
As you can see, with flash compensation the subject becomes brighter because the flash power is increasing. We do see some spill onto the background but if the subject were further from the background we'd see even less of a change of brightness on the background.
Next we tried using the built-in flash as a fill light.
Setup: Jaclyn is silhouetted by light from outside the studio.
Now we see the detail in Jaclyn's face thanks to fill flash.
But now we have a new problem: mixed light. (I.e. the color temperature of the light outside the studio is different than the light coming from the built in flash.)
Solution: add a gel to the flash to make it the same color as light from the classroom beyond the studio.
Now both lights are the same color but we need to make sure that the camera is balanced for that color.
Solution: Change white balance setting to tungsten (adjusts for lighting with orange/yellow color cast)


Last week we watched this video explaining the difference between TTL, ETTL and ETTL II which is very helpful in understanding how all versions of TTL flash work and the differences between them.
To begin we worked with the Canon 580EX-II in ETTL mode, mounted on the hot shoe of the camera.
We first shot in P or Program mode. In Program mode the camera decides the aperture and shutter speed for you and with ETTL mode the speedlight and camera communicate with each other to choose a power setting for the flash.
 |
| ISO 1600, f4, 1/60 second; Camera in P / Program shooting mode Canon 580 EX-II on hot shoe in ETTL mode |
The result is a decent exposure for the subject but still a little underexposed and the background is quite dark. If we wanted to make adjustments to the overall exposure in this setting we could use exposure compensation (adjusts aperture, shutter or ISO to let more light into the camera) or flash compensation (set on speedlight unit, will use higher power on flash), but more on that later.
Next we next tried Av and Tv settings. These are both semi-automatic camera settings that also allow the use of exposure compensation, but in addition will take ambient light into consideration.
First Tv, in this shooting mode you choose the shutter speed but the camera chooses the aperture. In this case since we were shooting with the flash in ETTL the flash and camera are still deciding on the power setting for the flash.
With Tv setting we chose a long shutter speed (2 seconds) to let in more ambient light.
 |
| ISO 1600, f8, 2 seconds; Camera in Tv shooting mode Canon 580 EX-II on hot shoe in ETTL mode |
Then we shot in Av mode. Av is the counterpart mode to Tv - now we choose the aperture and the camera chooses the shutter (based on information from the light meter and ETTL flash).
With Av selected we chose f4 because we knew it was dark in the room without much ambient light and the camera chose a shutter speed of 1/2 second so we see more ambient light and a bit of movement in this one.
 |
| ISO 1600, f4, 1/2 second; Camera in Av shooting mode Canon 580 EX-II on hot shoe in ETTL mode |
Next we moved on to using the built-in flash. The Canon 70D has a small, built-in flash unit that can also operate in ETTL or Manual mode. Today we worked with it in ETTL mode.
First we shot with the built-in flash in P mode.
 |
| ISO 1600, f4, 1/60 second; Camera in P mode Built in flash fired in ETTL |
Then we experimented with exposure compensation and flash compensation.
 |
| ISO 1600, f4, 1/60 second; Camera in P mode, Exposure Compensation +1 Built in flash fired in ETTL |
Unfortunately when we were shooting in class this didn't have quite the effect we wanted, which was that with exposure compensation +1 the subject and the background should both appear slightly brighter. My guess as to why this did not work so well was because the camera would use aperture for this (hence making both subject lit with flash and any background/ambient light brighter) BUT we were at the limit of our aperture which was as wide as it could go for this focal length so both images appear the same.
So we moved on to flash compensation.
 |
| ISO 1600, f4, 1/60 second; Camera in P mode Built in flash in ETTL with flash compensation |
 |
| ISO 1600, f4, 1/60 second; Camera in P mode Built in flash in ETTL with flash compensation +2 |
As you can see, with flash compensation the subject becomes brighter because the flash power is increasing. We do see some spill onto the background but if the subject were further from the background we'd see even less of a change of brightness on the background.
Next we tried using the built-in flash as a fill light.
Setup: Jaclyn is silhouetted by light from outside the studio.
 |
| ISO 1600, f4, 1/60 second, camera in Manual mode No flash |
Problem: we see no detail in Jaclyn's face.
Solution: add built-in flash as fill
 |
| ISO 1600, f4, 1/60 second, camera in M Built-in flash fired in ETTL mode |
Now we see the detail in Jaclyn's face thanks to fill flash.
But now we have a new problem: mixed light. (I.e. the color temperature of the light outside the studio is different than the light coming from the built in flash.)
Solution: add a gel to the flash to make it the same color as light from the classroom beyond the studio.
 |
| ISO 1600, f4, 1/60 sec; camera in M Built-in flash fired in ETTL Orange gel added to built-in flash White balance set to daylight |
Now both lights are the same color but we need to make sure that the camera is balanced for that color.
Solution: Change white balance setting to tungsten (adjusts for lighting with orange/yellow color cast)
 |
| ISO 1600, f4, 1/60 sec; Camera in M Built-in flash fired in ETTL mode Orange gel on built-in flash White balance set to tungsten |
Here we have the final result with Jaclyn lit in equal proportion to the background.
We can also control the lighting ratio of Jaclyn to the background by adjusting the flash compensation which will adjust the flash power.
 |
| ISO 1600, f4, 1/60 sec; camera in M Built-in flash fired in ETTL with flash compensation in -1 Orange gel over built-in flash White balance set to tungsten |
In this last one we see Jaclyn is slightly darker but the background is the same brightness. That's because only the power of the flash has changed, which will only effect the lighting on the subject in this case. If we wanted to make Jaclyn brighter we could also increase the flash compensation.
Then we experimented with what I like to call "Party Mode." Many digital cameras have different modes or scenes which are like presets that will create a certain effect. If I could design one for a camera it would be called "Party Mode" and the settings would be: slow shutter speed, built-in flash on and possibly high ISO and shooting in black and white. Note: if shooting in RAW your image will still appear on your computer in color, you will have to convert in post-production (if shooting in JPG images shot in black and white will appear in black and white).
Here is one result that uses all four of the above mentioned settings:
 |
| ISO 1600, f4, 1/2 second Built-in flash fired Converted to black and white in post |
As we can see the appearance of movement caused by the slow shutter gives the effect of a fun, festive mood, but the flash adds a little bit of sharpness to the image so we see some details of people and faces.
One caveat with working with this method is that often background/ambient light at parties can often be a different color, usually an orangey-yellow color caused by tungsten light.
 |
| ISO 1600, f4, 1/60 second Built-in flash fired |
This orange color cast doesn't bother everyone but if it does there are a couple ways to deal with it. One cheat is using the method I have outlined above - shoot in black and white (or turn it black and white in post production) so you avoid the problem altogether. Another approach is to put an orange corrective filter gel on the flash to make it match the background/ambient light.
 |
| ISO 1600, f4, 1/60 sec Built-in flash fired with orange corrective gel White balance set to tungsten |
This gives a more natural look.
Or you can take it in the opposite direction; for an additional fun kick we also tried adding a purple gel to the scene instead of the corrective orange.
 |
| ISO 1600, f4, 1/60 Built-in flash fired with purple gel White balance set to daylight |
Next we experimented with 1st (Front) and 2nd (Rear) curtain sync. When the camera's shutter opens there are actually two parts or curtains that raise and lower to let light into the camera. As we discussed in a previous class that is why sync speed is important when shooting with flash otherwise we will see the effect of part of the shutter blocking light from part of the photo.
The first (or front) curtain opens from bottom to top to let light in and then the second curtain comes in from bottom to top after it to stop light from entering the camera. For a visual of how this works, check out this youtube video and skip to around 1:38 to see the inside of the camera and the two parts of the shutter move up and down.
So when does the flash fire?

In the above illustration we see the flash occurring just as the shutter is fully open. This is called 1st or front curtain sync.
The problem with first curtain sync is that the direction of motion looks "backwards" because the flash fires first and then more light collects on the sensor while the shutter remains open so we see a motion smear in front of the moving object rather than behind, which causes the moving object to appear as though it is moving in the opposite direction.
Take this image we created in the studio in which Reilly is throwing a football to Cody. Even though Reilly threw the ball and Cody was the one to catch it this image makes it appear as though Cody was throwing it to Reilly.
 |
| ISO 400, f22, 1 second Built-in flash fired 1st curtain sync |
We then changed the flash setting to 2nd curtain sync and then the ball appeared to be moving in the proper direction.
 |
| ISO 400, f22, 1 second Built-in flash fired 2nd curtain sync |
Though faint we can see a light green streak behind the ball which more accurately represents that Reilly threw it to Cody.
Lastly we experimented with bounce flash. Bouncing flash can be a great technique to use when you are forced to shoot with the flash on the camera. By bouncing the light off a ceiling or wall you can create a bigger light source which gives a more diffused look.
For this exercise we once again turned to our speedlight in ETTL mode and shot with the camera in P.
Here is an image shot with the flash pointing at the subject for comparison:
 |
| ISO 800, f4, 1/60 second; camera in P Canon 580 EX-II in ETTL mode, mounted in hot shoe, pointing a subject |
In this image you can see the slight vignetting (darkening at corners) of the image. If you are shooting this wide you can use the wide angle diffusion panel to cause the light to spread out even further.

The wide angle panel is built-in to the Canon 580EX-II and many other flash units. It looks like this and can be pulled out and over the flash to spread out the light.
 |
| ISO 800, f4, 1/60 second; camera in P Canon 580 EX-II in ETTL mode, mounted in hot shoe With wide angle panel |
Then, still using ETTL flash in P mode we bounced the flash from the ceiling
 |
| ISO 800, f4, 1/60 sec; camera in P Canon 580 EX-II in ETTL mode, mounted in hot shoe Pointed at ceiling to create bounce diffusion and change direction of light |
You can see this has a much more flattering look because it spreads out/diffuses the light (think of bouncing a flashlight from the ceiling in a dark room) and also we see it coming from a different direction - from above rather than that frontal light which creates the flat mug-shot look.
We can also bounce the light off the wall which is also has a better look than straight-on camera flash because it is diffused and not coming from the front, but it will also create uneven light on the face and a quick fall-off of light to one side of the subject.
 |
| ISO 800, f4, 1/60 sec; camera in P Canon 580 EX-II in ETTL, mounted in hot shoe Bounce-flash pointed at wall |
A reflector can be added to the opposite side of the subject to fill in the light a bit on the shadowed side.
 |
| ISO 800, f4, 1/60 sec, camera in P Canon 580 EX-II in ETTL, mounted in hot shoe Bounce flash pointed at wall Silver reflector to subject's right to fill in shadows |
 |
| Production stills by Tiancong "Jacob" Huang |
Thursday, April 13, 2017
Assignment 11: Speedlights Part 2
Use the same subject for all photos
Layout your best result from each of the 4 techniques:
Layout your best result from each of the 4 techniques:
- Use direct flash on camera Program mode
- Use flash fill Aperture Priority mode
- Bounce flash off the ceiling or wall in Program mode.
- Use direct flash off camera Program setting
Each image should have a noticeably different look. If the images look too similar try something else within the bounds of the assignment.
Each image should be well-exposed, aesthetically interesting and with intentional framing/background.
Label each image with both camera settings as well as camera mode (P, Av etc.) and above descriptors of which part of the assignment each image corresponds to.
Wednesday, April 12, 2017
Lesson 10: Speedlights Part 1
Technically speedlight (also speedlite) is a brand name for both Canon and Nikon's small, portable, on-camera flash units, but this term has been used colloquially to describe any small, portable flash unit that can fit into the camera's hot shoe or be triggered separately off-camera.
Next we adjusted shutter speed to control the lighting ratio between subject and background
Next we added movement into the mix to create some interesting effects.
Then we moved the speedlight off the camera, first using the TTL cord and then using pocketwizards or "long shutter, long arms" in the case of one speedlight for which the PC connection was not working.
We also went over various modifiers that can be used with speedlights


As you can see, getting the flash off-camera gives you a lot more versatility for direction of light and also what modifiers you can use.
Lastly we added movement back into the mix for some spooky results.


The "ghost" effect is caused by the subject moving out of the way after the flash has fired (during a long exposure) so we see their shape sharply with good exposure thanks to the flash but after they move out of the way and the long exposure continues some light from the background also collects in the spot where they were standing so we see a double-exposure effect.
A great source to learn more about working with these types of lights is the Strobist blog. I recommend starting with Lighting 101 and then clicking through each next tutorial from there. Strobist contains many wonderful tips from the basics of assembling an affordable speedlight kit to how to sync to more advanced tips and assignments.
Why are speedlights a great source of light?
- Can be bounced off of the wall or ceiling to fill a dark space
- Can be used to brighten a subject
- Smaller footprint than studio lights
- Portable
- Can work with modifiers to create a bigger light source (i.e. umbrellas, softboxes, etc.)
- Cheaper than purchasing strobe packs
The speedlight can be synced with the camera in a number of ways:
- Hot shoe
- Corded i.e. off-camera TTL sync cord, attaches to hot shoe
- Should maintain TTL functions
- Requires holding by hand off-camera - limited range of placement
- Radio transceivers such as pocket wizards
- These can move far away from camera and therefore give the most control
- Long shutter, long arms - this is a term I made up to describe using a long shutter speed (around 1/2 second or longer) and manually pressing the fire button on the flash
- Built-in flash as master - this should work if speedlight is set to visual slave, but may not work in all cases
- Hot shoe speed light as master (same as above)
First we used the flash on-camera and used adjustments to the speedlight power on manual setting along with aperture and ISO adjustments to get an exposure that looked good for our subject.
 |
| ISO 800, f8, 1/60 sec, flash on camera |
Next we adjusted shutter speed to control the lighting ratio between subject and background
 |
| ISO 800, f8, 1 sec, flash on camera |
 |
| ISO 800, f8, 2 sec, flash on camera |
Next we added movement into the mix to create some interesting effects.
 |
| ISO 1600, f 5.6, 1 second, flash on camera |
 |
| ISO 1600, f 4, 1/2 second, flash on camea |
 |
| ISO 1600, f 4, 1/2 second, flash on camera |
Then we moved the speedlight off the camera, first using the TTL cord and then using pocketwizards or "long shutter, long arms" in the case of one speedlight for which the PC connection was not working.
 |
| ISO 1600, f 4, 1/8 second, flash off-camera |
We also went over various modifiers that can be used with speedlights
Modifiers for on-camera speedlight
- Diffusion sheets
- Cinefoil snoot
- Gels
Modifiers for off-camera speedlight
- Diffusion sheets
- Softbox + bracket
- Umbrella + bracket
- Gels
- Cinefoil snoot
We then combined the technique of off-camera flash with various modifiers including gels.


As you can see, getting the flash off-camera gives you a lot more versatility for direction of light and also what modifiers you can use.
Lastly we added movement back into the mix for some spooky results.


The "ghost" effect is caused by the subject moving out of the way after the flash has fired (during a long exposure) so we see their shape sharply with good exposure thanks to the flash but after they move out of the way and the long exposure continues some light from the background also collects in the spot where they were standing so we see a double-exposure effect.
A great source to learn more about working with these types of lights is the Strobist blog. I recommend starting with Lighting 101 and then clicking through each next tutorial from there. Strobist contains many wonderful tips from the basics of assembling an affordable speedlight kit to how to sync to more advanced tips and assignments.
 |
| Produtction Stills by Cody Kjos |
Subscribe to:
Posts (Atom)